INDEX
Valve reference
Throughout this article, valves are referenced by number (Valve 1, Valve 2, etc.) and configurations are referenced by name ("Normal operation", "Rinse system", "Rinse Tank", "Empty system"). The valve assembly is located under the left side cover of the machine, and a label inside the cover shows commonly used valve positions for quick reference.

Daily Use
Powering on the AX-1
The machine can be started either with generator operation (mandatory for spraying, since battery-only operation has very limited runtime) or with battery operation (suitable for short tasks such as moving the robot).
Filling the tanks
The AX-1 has three separate tanks, all of which must be properly filled before spraying can begin:
- Herbicide tank: holds the diluted herbicide mixture that will be sprayed.
- Rinse tank: holds clean water used to flush the spray system after use.
- Clean water tank: holds clean water reserved for safety in case that accidental herbicide contact occurs.

Filling the rinse tank and clean water tank
Warning: Only water must be filled into the rinse tank and the clean water tank. Never put herbicide or any other chemical into these tanks.
Both tanks must be full of water at startup. They are filled from the right side of the machine. Two filling ports with screw caps are located under the side cover next to the generator:
- The left port is for the clean water tank.
- The right port is for the rinse tank.

To minimize unnecessary water spillage, it is recommended to use a water hose for filling. The generator can withstand some water splashes.
Mixing herbicide in the herbicide tank
Caution: Always ensure the tank strainer is placed in the tank's filling opening during filling and operation. Make sure it rests evenly and flat on the flange.
The herbicide tank is operated from the machine's left side, under the side cover. Remove the tank lid by turning it half a turn counterclockwise. The strainer must always remain in place in the tank opening to filter out larger particles. The tank is filled with water through this opening.
Follow the herbicide label's instructions for the mixing ratio between water and herbicide, and calculate the required amount of water.
Mix the herbicide directly in the tank: first pour in the water, then add the correct amount of herbicide according to the water volume and mixing ratio.
Start the pump and let the herbicide circulate for at least 3 minutes (valve position "Normal operation") to ensure the water and herbicide mix thoroughly. This must be done before spraying can begin.
Refueling the generator
Refueling can be done with the generator mounted on the robot. Make sure the generator is turned off before refueling.
Use 4-stroke alkylate gasolin or gasoline with an octane rating of ≥ 95.
- Open the generator's fuel cap and place it in a clean area to avoid dirt entering the fuel tank when reattaching it.
- Pour gasoline into the generator's tank. If the fuel can has an attached hose or funnel, use it for easier filling.
- Stop filling before the tank is completely full to prevent overflow when screwing the cap back on.
- Screw the cap back on securely.
Start and deploy
Before you start
- Robot is powered on, is connected to the network, and has RTK fix.
- Spray tank is filled and the correct product is loaded.
- Field is clear of people, animals, and obstacles.
In Kilter Remote
- Open Kilter Remote and select the correct robot.
- Load the prepared route for the field —
[link: Creating and editing routes] - Verify spray parameters (rate, pressure, nozzle selection) —
[link: Configuring spray parameters] - Confirm headland turning behaviour for this field —
[link: Headland settings]
Start the operation
- Press Start in Kilter Remote and confirm autonomous mode is engaged
- Watch the first headland turn and the first spray pass to confirm correct behaviour
- Monitor progress via the Kilter dashboard —
[link: Monitoring an active operation]
If something goes wrong
- See Q&A
[link: Q&A]and[link: Troubleshooting]or contact the support[link: support].
Quick rinse after spraying
Use the quick rinse procedure for short-term flushing of the nozzles when pausing operation without emptying the herbicide tank. For thorough cleaning when changing herbicide, emptying the tank, or preparing for storage, use the full cleaning procedure described in Maintenance.
- In the Kilter Remote app, open the cleanup menu.
- Select and follow the steps for the "QUICK" procedure.
- Make sure all filters are clean and not clogged, blockages reduce rinse effectiveness


Technical data
|
Specification |
Value |
|
Consumption at 100% weed coverage |
278 L/ha |
|
Maximum speed in autonomous operation |
~3 h/ha (0.5 m/s) |
Maintenance
Regular and properly executed maintenance helps extend the AX-1's service life and improves operational reliability. The product warranty is valid only if the maintenance schedule is followed.
Some repairs and maintenance tasks can only be performed by service personnel authorized by Kilter, for example, annual maintenance and the periodic inspection of the sprayer (sprayer certification). All spare parts must be original parts supplied by Kilter AS or an authorized distributor.
General safety
Warning: Risk of pinching, cutting, shearing, severing, entrapment, entanglement, pulling in, catching, and impacts at unprotected danger points. Follow the safety instructions during all maintenance, repairs, and servicing activities.
- If covers or other protective equipment are removed during maintenance, repairs, or cleaning, they must be reinstalled afterward.
- Damaged protective equipment must be replaced.
- The machine's main power switch must be turned off during all maintenance and repair work.
- Before performing service or repairs, the machine must be emptied of herbicide and the circulation system must be cleaned.
- The machine must be externally cleaned to eliminate the risk of contact with herbicide residue.
Before each startup
Inspect hoses, pipes, valves, and connection parts for leaks, wear, and defects. If faults are detected, they must be repaired and/or reported immediately.
Control unit
Danger: Contact with high-voltage points poses an immediate life-threatening risk.
Any issues related to the control unit must be addressed by authorized service personnel, particularly anything that involves opening the cover. The inside of the control unit contains exposed high-voltage points and other sensitive components.
It is strongly discouraged to connect a personal computer to the control panel's ports for troubleshooting or software updates, as this can result in critical software errors.
Service tasks that users may perform themselves are limited to cleaning the exterior of the control panel and cleaning or replacing the air filter.
Cleaning the spray system (full procedure)
Use the full cleaning procedure when changing herbicide, emptying the tank, or preparing the machine for storage. For short pauses during operation, use the Quick Rinse procedure described above instead.
Caution: Always use the necessary safety equipment when draining herbicide.

Step 1: Drain the herbicide tank
Warning: When draining herbicide and disposing of cleaning residues, no discharge into the environment is permitted. Residues must be collected, labelled with their contents, and delivered to a hazardous waste disposal facility.
After spraying, residue may remain in the herbicide tank. Drain it before cleaning:
- Place a collection container under the drain point.
- Set the valves to the "Drain system" position and start the pump.
- Let the pump run until the tank is empty of herbicide.
- Open Valve 7 to release the last remnants.
- Set the valves to "Rinse system" position to prepare for rinsing the tank, hoses, and nozzle blocks.
Step 2: Clean the spray system after use
The full cleaning procedure is available in Kilter Remote. Follow the step-by-step guide in the app, as it provides access to the necessary machine controls and the most up-to-date procedures. Refer to the label under the left cover of the machine for illustrations of commonly used valve positions.
The cleaning process follows the principle of stepwise dilution of residual herbicide. The liquid system is rinsed and flushed with a washing nozzle three times using water. After each step, the rinse water is drained.
Residual volume after draining
After completing the cleaning procedure, a small residual volume (less than 0.1 L) of herbicide may remain in the tank. This can be drained manually by opening Valve 7.
Changing herbicides
When switching between herbicides, use a soap specifically designed for cleaning spray equipment.
Cleaning the spray system when herbicide is still in the tank
Caution: Make sure Valves 2, 3, and 4 are closed to prevent unintended dilution of the herbicide.
- Place a collection container under the drain point.
- Set the valves to "Rinse system", except for Valve 3 (which remains closed) and Valve 6 (which is opened).
- Run the pump until all the water in the rinse tank is used. Perform two rounds of Nozzle Rinsing (accessible in Kilter Remote) while the water flushes the system.
- Set the valves back to the "Normal operation" position.
Pump
Perform the internal rinse procedure (described in the cleaning section above) after each spraying session to maintain the pump. If leaks occur or replacement parts are needed, contact your Kilter customer representative.
Cleaning the machine
Warning: Always use the recommended protective equipment when washing the machine, as herbicide residue may be present on it.
Key rules for all cleaning of the machine:
- The machine must always be turned off during cleaning. If powered on, the fans may draw in water and damage the electronics in the control panel.
- The generator must always be turned off and its power cord disconnected during cleaning.
- Use low-pressure water when rinsing around the tank to minimize water contact with the underside of the control panel and the generator.
- Do not spray the wind sensor with high-pressure water.
- Do not use soap to clean the nozzle blocks — soap can compromise the nozzles' sealing capability and lead to leaks. Clean the nozzle blocks with water only.
- Do not use paper or lint-producing cloths on the nozzle blocks. Debris and lint can cause leaks and reduce droplet quality.
External cleaning
Important: Do not clean the machine at close range (less than one meter) with a high-pressure washer. High-pressure water can penetrate and damage the electronics.
The machine can be cleaned externally using a water hose, soap, and a sponge or lint-free cloth.
Internal cleaning
Warning: Never clean the inside of the control panel.
The interior areas have different cleaning requirements:
- Tank module (under the left side cover): Clean using a low-pressure water hose, sponge, or lint-free cloth. Soap may be used, but make sure no soap residues enter the tanks.
- Generator (under the right side cover): Do not use a water hose. Use a sponge or a damp, lint-free cloth instead. Soap may be used, but make sure no residues enter the fuel tank.
- Spray units and inside of the boom: Clean with a low-pressure water hose, sponge, or lint-free cloth. Make sure no lint or debris enters the nozzle holes. Do not use soap, as it can compromise nozzle functionality if it enters the nozzle holes.
Spray unit
Important: Do not use a high-pressure washer to clean the spray units externally, this can damage the nozzles and electronics. When using a water hose, avoid directing the stream straight into the nozzle outlet.
Spray fluid may accumulate on the nozzles after use. Rinse them gently with low pressure from a water hose.
If you encounter issues with the spray units, contact Kilter AS for support. Do not attempt repairs on your own without approval from Kilter, doing so will void the warranty.
Filters
The AX-1 has several filters that must be inspected and cleaned regularly. Residual herbicide caused by inadequate cleaning of the spray system can lead to clogged filters, so consistent maintenance is essential.
Suction filter
The suction filter is located at the front of the tank, beneath the left side cover, in the fluid line before the pump.
- Open the filter housing.
- Remove the filter and the magnet.
- Wash the filter thoroughly with clean water.
- Reassemble the filter and housing.
Empty and rinse the filter regularly. Inspect it visually before each use, and make sure it is free of visible particles before reinserting it. If the filter has been clogged and a deformation has occurred, replace it with a new filter, this is also a sign that inspection and cleaning need to happen more often.
The filter is equipped with a magnet that captures metallic particles. Clean the magnet by wiping it, blowing it with compressed air, or using tape to remove debris. Check and clean the filter especially before and after long-term storage.
Make sure the filter screen is centered in the filter housing before tightening the lid. Misalignment can damage the filter.
Warning: Individuals with pacemakers should avoid handling magnets.
Warning: Wear safety goggles and gloves when handling large magnets. Avoid pinching fingers between magnets or letting them collide with other magnets or metallic objects — collisions can cause magnets to crack.
Important: Strong magnetic fields can permanently damage credit cards, hard drives, watches, and other electronic devices.
Important: If the filter is defective and its filtration capability is compromised, it must be replaced before the machine is put into operation.
High-pressure filters (on spray units)
Each spray unit is equipped with a fine-mesh inlet filter (250 mesh) that captures small particles. Inspect the filters' condition before use.
- If there is liquid in the tank, disconnect both hoses of the spray unit from the boom.
- Open the filter housing carefully.
- Make sure the hose connection area does not get contaminated with sand or dirt.
- Unscrew the filter cup.
- Remove the filter screen from the filter cup.
- Submerge it in soapy water to dissolve any residual herbicide.
- Rinse both the filter and the filter cup thoroughly with clean water.
Note: Compressed air can also be used to blow the filters clean instead of soapy water. Either way, make sure to rinse the filter in clean water as the final step.
Important: It is very important to wash the cup as well as the filter.
Tank strainer
Remove the tank strainer from the tank opening, empty it, and rinse it with clean water regularly or as needed. Make sure it is free of visible particles before reinserting it into the tank opening.
Control panel air filter
The control panel has an air filter at the air intake on the front of the robot. Clean it as needed, or every two weeks during the operational season.

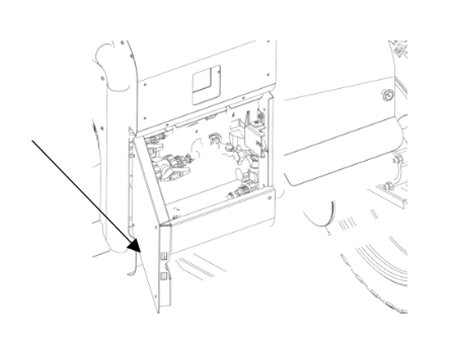
- Open the front door using the red handle located under the left side cover.
- Loosen the two screws at the bottom of the filter tray, beneath the control panel.

- Tilt the filter tray downward, then pull it out.

- Unscrew the gasket plate from the filter tray.
- Remove the two air filters. Clean them by either washing with lukewarm water or vacuuming. Make sure they are completely dry before reinstalling. Alternatively, replace them with two new Xiaomi filters (model SDLW04RR).

- Reverse steps 1–4 to reinstall the filters and secure the filter tray.
The control panel also has an internal filter at the rear air outlet that prevents dust from entering when the machine is not in use. This internal filter should only be cleaned or replaced by authorized service personnel, and does not require cleaning as frequently as the intake filters.
Generator maintenance
Caution: Familiarize yourself with the specific warnings in the generator's user manual regarding service and maintenance.
- Unscrew the four screws securing the generator baseplate to the machine.
- Tilt the generator slightly upward at the front, then lift the generator and baseplate diagonally out of the machine using the carrying handle.
- Refer to the generator's user manual for the specific steps to follow.
- Place the generator and baseplate back into the machine's right compartment. Tilt the rear end slightly downward for proper placement.
Oil change
Caution: Used oil drained from the generator must be disposed of as hazardous waste at a recycling station.
Perform oil changes regularly as outlined in the generator's user manual.
Cleaning the generator's air filter
Clean the air filter regularly as specified in the generator's user manual.
Spark plug
Inspect and replace the spark plug as recommended in the generator's user manual. The spark plug can be inspected or replaced without removing the generator from the machine.
Other generator maintenance
For additional tasks such as checking and adjusting valve clearance, cleaning the combustion chamber, cleaning the fuel tank and filter, or inspecting the fuel hose, refer to the generator manufacturer and user manual.

Periodic inspection
Contact your dealer or Kilter (Contact Kilter) to have the periodic inspection performed. Some maintenance tasks, including annual maintenance and sprayer testing, can only be performed by service personnel authorized by Kilter.
Granting access
You can grant a workshop or inspector access to the machine for 24 hours via Kilter Farm.
National and regional regulations
The machine is subject to national regulations for periodic inspection of the robot's spraying functionality.
Storage
Winter storage
To enable a smooth return from hibernation, follow these procedures before storing the AX-1 over winter or any prolonged period.
Storage conditions
- The storage area should have low relative humidity and ideally be dust-free.
- Ideally, store the AX-1 indoors at room temperature.
- Make sure rodents are kept away from the machine.
- Store the generator according to Honda's recommendations (see the generator handbook, Chapter 9).
Preparing the battery for storage
The battery needs to have a high enough voltage at the start of the storage period, it is often necessary to charge it before storing. During prolonged storage, check the voltage regularly and recharge as needed. The battery is ready for storage when the voltage reaches 52 V. Check this in the Kilter Remote app while the AX-1 is on and not connected to charging power.
In the app, navigate to Control panel → Diagnostic to check the battery voltage. If the voltage is lower than 52 V, charge the battery.

Preparing the liquid system for winter storage
To avoid damage from expanding ice, antifreeze must be added to and distributed throughout the liquid system. Use a propylene glycol-based antifreeze suitable for agricultural equipment. Do not mix different types of antifreeze.
-
Step 1: Empty water from the system
Before adding antifreeze, the liquid system (including all tanks and hoses) must be emptied of water. The system does not need to be completely dry, but the remaining water must not dilute the antifreeze enough to compromise its freezing point.
Empty the herbicide tank:
- Set the valves to the "Empty system" position and open the Kilter Remote app.

- In the control panel, turn on the pump.
- Let the pump run until the herbicide tank is empty and water is no longer running from the tap.
- Stop the pump.
- Open Valve 7 to empty any remains from the hoses.
Empty the rinse tank:
- With the valves still in the "Empty system" configuration, set Valve 1 to the upright position to collect water from the rinse tank.

- In Kilter Remote, open the control panel and turn on the pump.
- Let the pump run until water stops running from the tap point next to Valve 6.
Empty the clean water tank:
- Open the tap and let all water empty from the tank, hose, and tap.
Important: Make sure antifreeze is properly rinsed out of the clean water tank before the next use. This tank is reserved for cleaning hands, face, or eyes if accidental contact with herbicide occurs, so any antifreeze residue could be harmful.
-
Step 2: Fill antifreeze
Dilute the antifreeze with water according to the instructions on the container. Assume that approximately 0.5 L of water remains in the system after emptying. A typical mix is 50% water and 50% antifreeze.
- Fill at least 4 litres of diluted antifreeze in the herbicide tank.
- Fill at least 3 litres of diluted antifreeze in the rinse tank.
- Fill at least 1 litre of diluted antifreeze in the clean water tank.
-
Step 3: Distribute antifreeze through the system
The antifreeze must be properly distributed through the liquid system to protect against frost damage.
- Set the valves to "Normal operation" and turn on the pump.
- If installed, open the white valve on the spray boom for 10 seconds, then close it.
- In Kilter Remote, open the control panel and start the "Clean Nozzles" procedure to rinse the nozzles with antifreeze.
- Open Valves 2 and 3, and close Valve 4.
- Open Valve 6 for a few seconds, then close it.
- Open Valve 7 for a few seconds, then close it.
- Open Valve 1 to pump antifreeze from the rinse tank.
- Close Valve 1 once the antifreeze has entered.
- Open the clean water tap briefly to allow antifreeze to enter the tap.
The antifreeze is now distributed throughout the liquid system.
Spring restart
Before the AX-1 is put back into operation in spring, the antifreeze must be removed from the system and replaced with clean water.
- Repeat the procedures for emptying the herbicide tank and emptying the rinse tank to remove as much antifreeze as possible.
- Refill the rinse tank with clean water.
- Empty the rinse tank again to flush out remaining antifreeze.
- Refill both the rinse tank and the herbicide tank with clean water.
- Run the standard cleaning procedure by following the guide in the Cleanup menu in Kilter Remote.
- Empty the clean water tank of antifreeze by opening the manual valve.
- Rinse the clean water tank thoroughly with clean water, then refill it with clean water.
Important: Make sure the clean water tank is completely free of antifreeze before use, since this tank is used for personal safety (rinsing skin or eyes after accidental contact with herbicide).
Parking
- Park the machine on a flat surface, it can roll on its own if left on an incline. The AX-1 has no active brakes when powered off.
- If parking on a flat surface is not possible, secure the wheels and/or the entire machine to prevent rolling.
- Never park the robot on an incline greater than the recommended operating incline of 7°.
- If parking on an incline, position the robot's right or left side downhill — this is more stable than facing front or rear downhill.
- If parking on an incline, make sure the machine cannot pose a risk to life or health if it begins to roll despite the precautions above.
- Park the machine in a location where children and unauthorized persons cannot easily access it and come into contact with residual herbicide.
Transportation and lifting
Towing
Important: The machine must not be towed, towing can damage its components (learn more here).
The robot's wheels should only roll when driven by the robot's own motors. If the robot is towed or pushed, the motors act as generators and produce voltage that can damage the control panel. During all forms of transport other than self-driving, the wheels must not have ground contact.
Lifting the machine
Danger: Humans and animals must never be underneath the robot when it is in a lifted position. Being under the robot may result in injury or, in the worst case, death.
If the machine, or parts of it, need to be lifted slightly off the ground (e.g., with a jack), the contact point must be underneath the motor compartment.
