
Table of contents
-
The Map
-
Create a Route
-
Route Edit Operations
-
Route Validation
-
Change an Existing Route
-
Headlands
-
Create a Route from an AB Line
-
Buttons
1. The Map
1.a Waypoints
 Waypoints. The points the robot visits. A segment starts at a hollow dot and ends at a filled dot.
 Current waypoint. A pulsing ring marks where the robot is headed next. The ring is red while you edit headlands.
1.b Segments
 Spray segment. The robot sprays the weeds it finds along this line, in the direction of the arrows. The arrows appear when you zoom in far enough.
 Segment without spraying. The robot drives it but does not spray.
 Current segment. Drawn bold with a dark outline.
 Outside the run. Segments before the start or after the ending point are faded grey.
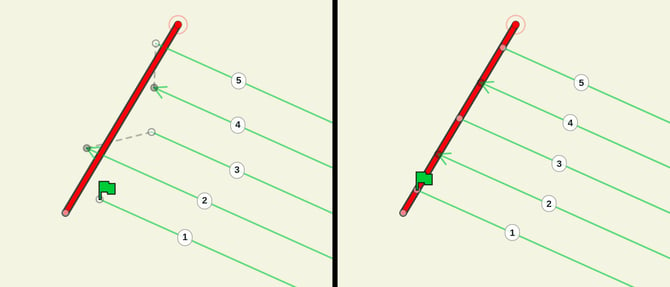
 Headland. Used to adjust the route segments, see Headlands.
 Transfer. The dashed line shows how the robot drives from the end of one row to the start of the next. It is darker around the current segment.
 Overlapping segments. Segments that lie on top of each other are drawn side by side and share one number. The segments themselves are not moved.
1.c Markers
 Run start and Run end.

 Segment number. Shown on the part of each row that is in view. When rows are close together, only some of them are numbered, and more numbers appear as you zoom in.
The number of the current segment is green  .
 Robot. The AX-1 seen from above.
 GNSS fix. The chip in the top left corner. It is green at 4 Fixed RTK. Tap it to see the coordinates.
1.d Problems
 Segment with a problem. An orange halo, and a warning sign on its number. See Route Validation.
2. Create a Route
- Open the Route Editor.
- Open the
 file menu and select
 New.
- Check that the chip in the top left corner of the map is green and says 4 Fixed RTK. If it does not, move the robot to a more open area.
- Press + on the Segment row to start a new segment. Its first waypoint is the current position of the robot.
- Drive the robot along the row, and press + on the Waypoint row to add waypoints where needed. You can start the next segment once the current one has at least two waypoints.
- Repeat steps 4 and 5 for each row.
- Do not connect the segments with waypoints. At the end of a segment the robot turns and drives to the next one by itself, along the dashed
 transfer line.
- To turn off spraying for a segment, press
 and select
 Change Spray Status.
Tip: You can always undo or redo a change with 
 .
3. Route Edit Operations
| Icon | Operation |
|---|---|
 |
Fit the route segments to the headlands |
 |
Generate a route from an AB line and headlands |
 |
Shift segments or waypoints to one side |
 |
Reverse segments or waypoints |
 |
Turn spraying on or off for one or all segments |
 |
Move the robot's position to the map marker |
4. Route Validation
The app checks the route every time you select or change it. A segment the robot cannot follow keeps its green or blue color, gets an orange halo, and a warning sign on its number. A red strip along the bottom of the map tells you how many segments have problems.
You cannot start autonomous driving while a segment with a problem is part of the run. Problems outside the run are shown with a faded halo, and on the Start page only the problems inside the run are counted.
Press Details on the strip to see every problem. The problems are grouped by kind, and each group says how to fix it. Tap a group to see the segments with that problem, in route order. Tap a segment, or  next to it, to select it and zoom the map to it. You can also tap a segment on the map to see what is wrong with it.
These are the checks, and how to fix what they find:
- Sharp turn inside the row. Two waypoints in the segment form a turn that is too sharp for the robot to follow while spraying.
Fix: review the waypoint that bends the row, and consider deleting it. If the row really turns, divide it into several segments at the turn, so the robot turns between them. - Too close to another segment. Two spray segments are so close that the robot would spray the same area twice.
Fix: delete the one that is not needed. If you want to drive both, turn off spraying for one of them with Change Spray Status. If a row goes around an obstacle, divide it at the detour and turn off spraying for the part that passes close to the other row.
- Overlaps another segment, both spray. Two spray segments lie on top of each other.
Fix: delete the one that is not needed. If you want to drive both, turn off spraying for one of them with Change Spray Status.
- Crosses another segment. Two spray segments cross each other.
Fix: usually a waypoint is placed in the wrong row. Review the crossing segments, and consider deleting the waypoint that crosses. - Probably reversed. The end of the next row is closer than its start, so the row may point the wrong way.
Fix: review the segment on the map and check the direction of all the segments around it. - Far from the next or previous segment. The end of the row is too far from the start of the next row. A long drive between two rows is fine when it follows a headland all the way, as when the route moves on to the next block of rows.
Fix: check that no row is missing, and that the rows are in driving order. If the gap is intended, add a transport segment between them: a segment the robot drives with spraying turned off with Change Spray Status. - Fewer than two waypoints. The segment is not a row, so the robot has nothing to follow.
Fix: add a waypoint, or delete the segment. - Very short segment. The segment is shorter than 0.4 meters. It is usually left over from editing, and it makes the rows around it look far apart.
Fix: review the segment and consider deleting it. - Outlier waypoint. A waypoint in the segment lies far away from the rest of the route.
Fix: review the waypoint, and consider deleting it.
Note: Kilter sets the limits for these checks. If a check flags a route you are sure is right, contact Kilter support.
5. Change an Existing Route
Select the route in the list below the map.
5.a Move Through the Route
- Use the arrows on the Segment and Waypoint rows to step through the route.
- To go straight to a number, press the counter between the arrows, for example 4 / 69, and type the number.
- Below the rows you see the length of the current segment and of the whole route.
5.b Reverse the Direction
Press  and select one of the
 reverse operations.
- Reverse Waypoints makes the robot drive the row in the opposite direction.
- Reverse Segments makes the robot start from the opposite side of the field.
5.c Add a Segment or Waypoint
New segments and waypoints are always added after the current selection.
- Select the segment or waypoint the new one should follow. The current waypoint has a pulsing ring, and the current segment is drawn bold with a dark outline.
- Drive the robot to where the new waypoint should be.
- Press + on the Segment or Waypoint row.
- Use the arrows to check that it was added in the right place.
5.d Shift Segments or Waypoints
Press and select  Parallel Shift Segments or Parallel Shift Waypoints. Which way is left or right depends on the direction of the segment.
Caution: Routes usually come from waypoints logged by a tractor during an earlier operation, so the segments follow the rows in the field. Shift segments with caution, and check the result on the map.
5.e Segments After the Ending Point
When an ending point is set on the Start page, a yellow note on the map tells you, because you cannot edit the segments after it. Press Clear on the note to remove the ending point, or close the note to keep it.
6. Headlands
You create and edit headland segments the same way as route segments.
- Select Headland with the toggle on the right of the tool row. The Segment row is now labelled Headland.
- Create a segment along the edge of the field where the robot turns.
- Press and select
 Fit To Headland. The route segments now start and end at the headland, as in the image below.
Important: Headlands are only used to adjust the route. The robot does not turn by itself when it crosses a headland, so always fit the route segments to the headland.
7. Create a Route from an AB Line
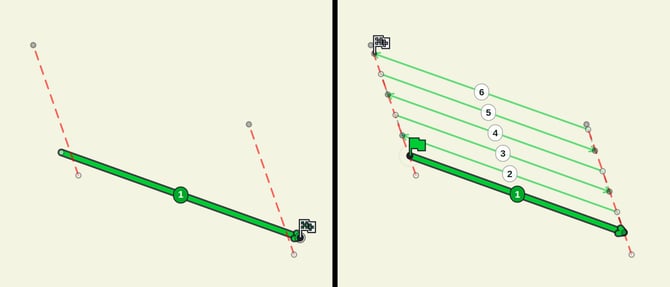
If the rows in the field are parallel, you can generate the whole route from the first row and headlands around the field.
- Create a new route and add the first row, see steps 2 to 5 of Create a Route.
- Add headlands around the whole field, see steps 1 to 3 of Headlands.
- Press , select
 Generate Segments From AB Line, and enter the distance between the row beds. The route is filled with segments, as in the image below.
8. Buttons
| Icon | What it does |
|---|---|
 |
File menu: create, delete, rename or write protect a route |
 |
Create a new route, in the file menu |
 |
Help for the route editor, next to the route list |
 |
Undo the last change |
 |
Redo the last change |
 |
Route edit operations |