Preparations for winter storage of AX-1
To enable a smooth return from hibernation, please make sure that the following procedures are followed before storing the AX-1 during the winter or any prolonged time.
- The storage area shall have a low relative humidity in the air and should ideally be dust-free.
- Prepare the liquid system for winter storage (see procedure below).
- Prepare the batteries for storage (see procedure below).
- Make sure that the generator is stored according to Hondas recommendations (reference is made to the handbook, Chapter 9).
- Make sure that any rodents are kept away from the machine
- Ideally the AX-1 should be stored indoors in room temperature
Preparing the battery for storage
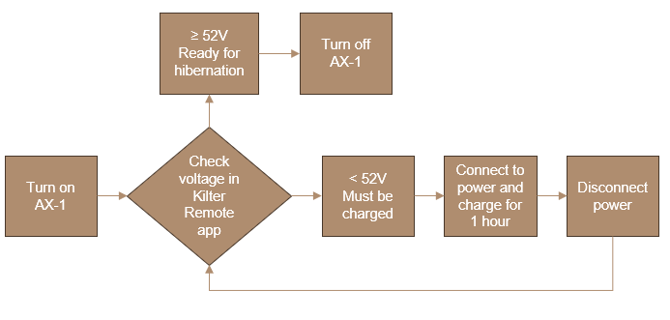
The battery needs to have a high enough voltage at the start of the storage period, it is therefore often necessary to charge it before starting storage. In prolonged storage it is recommended to to regular checks of the voltage and additional charging.
The battery is ready for storage when the voltage is 52 V, this must be checked in the Kilter Remote app when the AX-1 is on and not connected to charging power.
In the app navigate to "Control panel-" - "Diagnostic", where you can check the battery voltage. If the voltage is lower than 52 V it needs to be charged. Please see the below flowchart.
Preparing the liquid system for winter storage
To avoid damages due to expansion of freezing water, anti-freeze must be added to and distributed in the liquid system.
It is recommended to use a propylene glycol-based anti-freeze that is suitable for agricultural equipment. Do not mix different types of anti-freeze.
Emptying water from the system
Before adding anti-freeze, the liquid system including all tanks and hoses must be emptied for water. It is not necessary to have them completely empty and dry, but the remaining water must not dilute the anti-freeze mix to a point where it negatively impacts the freezing point of the mix.
Emptying the herbicide tank

- Put the valves in the "empty system" position and open the Kilter Remote app.
- Enter the control panel and turn on the pump, it will gradually increase the rpm until maximum.
- Let the pump run until the water in the herbicide tank is emptied and it is no longer running from the tap.
- Stop the pump, open valve no. 7 to empty any remains from the hoses.
Emptying of the cleaning tank

- With the valves in the "empty system" configuration from emptying of the herbicide tank, put the valve no. 1 the uprigth position to collect water from the cleaning tank.
- In the Kilter Remote app, enter the control panel and turn on the pump.
- Let the pump run until water stops running from the tap point next to valve no. 6.
Emptying of the pure water tank
Open the tap and allow all water to empty from the tank, hose and tap.
Make sure that the anti-freeze is properly rinsed out before the next start, this is to avoid any harm from remaining anti-freeze if the water is used for cleaning hands, face etc.
Filling of anti-freeze
The anti-freeze should be diluted with water according to the instructions on the container.
It is recommended to assume that 0,5 litre of water is remaining in the system after emptying.
Typically the mix is 50% water and 50% anti-freeze.
- Fill minimum 4 litre of diluted anti-freeze in the herbicide tank.
- Fill minimum 1 litre of diluted anti-freeze in the pure water tank.
- Fill minimum 3 liter of diluted anti-freeze in the cleaning tank.
Distribution of anti-freeze in the liquid system
The anti-freeze must be properly distributed in the liquid system to avoid damaged from frost.

- Put the valves in "normal operation"-position and turn on the pump.
- If installed, open the white valve on the spray boom for 10 sekonds before closing.
- In the Kilter Remote app enter the control panel and start the «Clean Nozzles»-procedure to rinse the nozzles with anti-freeze.
- Open valves no. 2 and 3, close valve no. 4.
- Open valve no. 6 in a few seconds, then close.
- Open valve no. 7 in a few secons, then close.
- Open valve no. 1 to pump anti-freeze from the cleaning tank.
- Close valve no. 1 when the anti-freeze has entered.
- The anti-freeze is now distributed in the liquid system.
- Open the clean water tap shortly to allow anti-freeze to enter the tap.