
Table of contents
Looking for maintenance, winter storage or transport? See AX-1 maintenance, AX-1 winter storage and spring restart and Transporting AX-1.
Valve reference
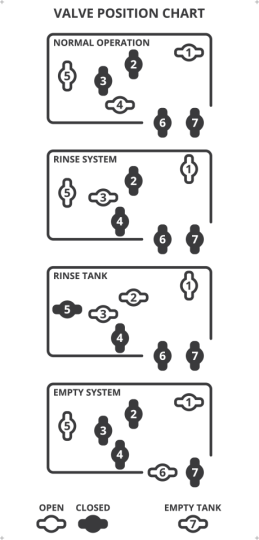
Throughout this article, valves are referenced by number (Valve 1, Valve 2, etc.) and configurations are referenced by name ("Normal operation", "Rinse system", "Rinse Tank", "Empty system"). The valve assembly is located under the left side cover of the machine, and a label inside the cover shows commonly used valve positions for quick reference.
Daily Use
Powering on the AX-1
The machine can be started either with generator operation (mandatory for spraying, since battery-only operation has very limited runtime) or with battery operation (suitable for short tasks such as moving the robot).
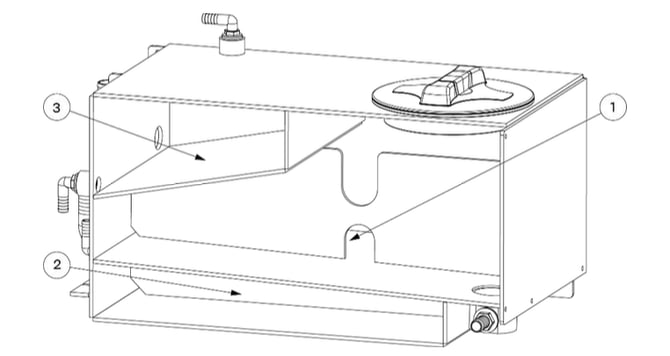
Filling the tanksThe AX-1 has three separate tanks, all of which must be properly filled before spraying can begin:
- Herbicide tank: holds the diluted herbicide mixture that will be sprayed.
- Rinse tank: holds clean water used to flush the spray system after use.
- Clean water tank: holds clean water reserved for safety in case that accidental herbicide contact occurs.
Filling the rinse tank and clean water tank
Warning: Only water must be filled into the rinse tank and the clean water tank. Never put herbicide or any other chemical into these tanks.
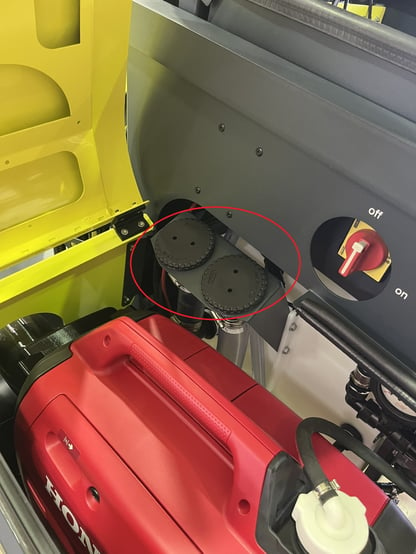
Both tanks must be full of water at startup. They are filled from the right side of the machine. Two filling ports with screw caps are located under the side cover next to the generator:
- The left port is for the clean water tank.
- The right port is for the rinse tank.
To minimize unnecessary water spillage, it is recommended to use a water hose for filling. The generator can withstand some water splashes.
Mixing herbicide in the herbicide tank
Caution: Always ensure the tank strainer is placed in the tank's filling opening during filling and operation. Make sure it rests evenly and flat on the flange.
The herbicide tank is operated from the machine's left side, under the side cover. Remove the tank lid by turning it half a turn counterclockwise. The strainer must always remain in place in the tank opening to filter out larger particles. The tank is filled with water through this opening.
Follow the herbicide label's instructions for the mixing ratio between water and herbicide, and calculate the required amount of water.
Mix the herbicide directly in the tank: first pour in the water, then add the correct amount of herbicide according to the water volume and mixing ratio.
Start the pump and let the herbicide circulate for at least 3 minutes (valve position "Normal operation") to ensure the water and herbicide mix thoroughly. This must be done before spraying can begin.
Refueling the generator
Refueling can be done with the generator mounted on the robot. Make sure the generator is turned off before refueling.
Use 4-stroke alkylate gasoline or gasoline with an octane rating of ≥ 95.
- Open the generator's fuel cap and place it in a clean area to avoid dirt entering the fuel tank when reattaching it.
- Pour gasoline into the generator's tank. If the fuel can has an attached hose or funnel, use it for easier filling.
- Stop filling before the tank is completely full to prevent overflow when screwing the cap back on.
- Screw the cap back on securely.
Start and deploy
Before you start
- Robot is powered on, is connected to the network, and has RTK fix.
- Spray tank is filled and the correct product is loaded.
- Field is clear of people, animals, and obstacles.
In Kilter Remote
- Open Kilter Remote and select the correct robot.
- Load the prepared route for the field (How to make a Route)
- Verify spray parameters (rate, pressure, nozzle selection)
- Confirm headland turning behaviour for this field
Start the operation
- Press Start in Kilter Remote and confirm autonomous mode is engaged
- Watch the first headland turn and the first spray pass to confirm correct behaviour
- Monitor progress via the Kilter dashboard (Kilter Monitoring)
If something goes wrong
- See Q&A and Troubleshooting or contact the support.
Quick rinse after spraying
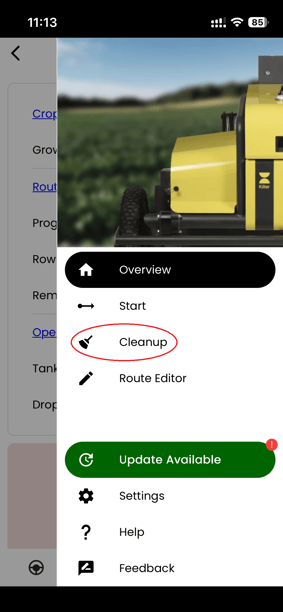
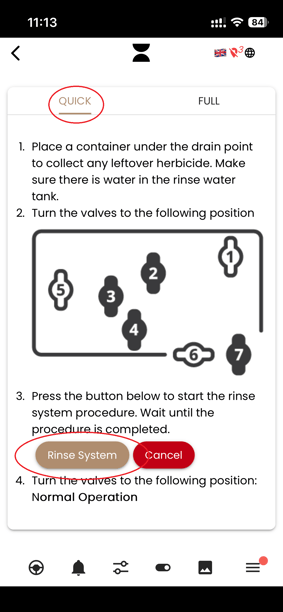
Use the quick rinse procedure for short-term flushing of the nozzles when pausing operation without emptying the herbicide tank. For thorough cleaning when changing herbicide, emptying the tank, or preparing for storage, use the full cleaning procedure described in Maintenance.
- In the Kilter Remote app, open the cleanup menu.
- Select and follow the steps for the "QUICK" procedure.
- Make sure all filters are clean and not clogged, blockages reduce rinse effectiveness
Technical data
|
Specification |
Value |
|
Consumption at 100% weed coverage |
278 L/ha |
|
Maximum speed in autonomous operation |
~3 h/ha (0.5 m/s) |
Parking
During normal operation, AX-1 holds its position using the drive motors. When the application is restarted, or the robot is rebooted or powered off, the drive motors briefly release while they re-initialise before re-engaging.
On level ground this has no noticeable effect. On an incline, however, gravity may cause the robot to roll a short distance downhill until the drive motors re-engage and stop it. This movement is expected behaviour and is not actively controlled by the robot.
The distance travelled is usually small, but it should always be anticipated whenever the robot is on a slope.
Before restarting on a slope
Whenever practical, move the robot onto level ground before restarting the application or power-cycling the robot.
If restarting on a slope is unavoidable:
- Keep people, equipment, and obstacles clear of the area downhill of the robot.
- Prevent the robot from rolling using suitable mechanical wheel restraints.
- Never stand or work directly downhill of the robot during a restart.
- Wait until the robot has fully restarted and the drive motors have re-engaged before approaching or resuming work.
On a trailer
The same behaviour applies during loading, transport, and unloading: powering the robot off releases the drive motors, so it must be mechanically secured before it is powered off. For the full procedure, see Transportation.